Showing posts with label gluten-free. Show all posts

Tuesday, November 13, 2012

Taste of Tuesday: GF, SF, DF Curried Butternut Squash Soup


Mmmm... it's that time of year, when squash are abundant and the chill in the air makes me crave soup. 


Looks to me like the tree of life. 


The thing with squash is the cutting it up. I wrestled with this butternut for the better part of an hour with two dull knives (Though squash is known to give even the sharpest knife a run for it's money). I was so proud of myself though when the outcome was a delicious soup. But the very next night, I met Mara Jane King -- "Just put the whole squash in the oven on 400 until your kitchen smells delicious", she said. I couldn't be more thrilled as I have made this soup several more times since - and who cares that we don't have a sharp knife in the house. It's sooooo easy!!!


I found this beautiful recipe from Karina over at Gluten Free Goddess. My edits in red.


Gluten Free, Sugar Free, Dairy Free Curried Butternut Squash

Ingredients:

1 tablespoon extra virgin olive oil
1 medium onion, diced
2 stalks celery, diced
2-3 teaspoons mild gluten-free curry powder
4 cups (diced) butternut squash 
4 to 6 cups light vegetable broth (or fresh water)
Sea salt and fresh ground pepper, to taste
1 tablespoon pure maple syrup or raw agave nectar, to taste
½ to 1 cup coconut milk

Instructions:

Preheat oven to 400. Put whole butternut squash on a cookie sheet and cook until your kitchen smells delicious (45minutes to an hour). Take out of oven, let cool until you can easily peel off the skin. Scoop out seeds and such. Cut up. 
Heat the olive oil in a soup pot, over medium heat. Add the onion, celery and curry powder; stir and cook until the onion softens. Add the squash and broth. Cover the pot and bring to a simmer.

Simmer until the squash is very soft and fork tender- maybe 30 minutes. Because I cook the squash in the oven, I simmer for about 10 minutes to meld favors.  

Puree the soup with an immersion blender till smooth. Stir in the maple syrup and coconut milk. Season with sea salt and pepper, to taste.

Warm through gently and serve. Enjoy!!


Tuesday, October 9, 2012

Taste of Tuesday: figs

Honey-Carmelized Figs with Yogurt


I made this delicious treat a few weeks ago and thought I would share it as I'm moving into a month of gluten, dairy and sugar free. I'm hoping someone else can enjoy this while I can't.

1 Tbsp honey (plus more for drizzling if you like)
8 oz fresh figs, halved
2 cups plain low-fat Greek yogurt
Pinch of cinnamon
1/4 cup chopped pistachios

1. Heat honey in medium skillet over medium heat. Cook figs, cut sides down, until caramelized, about 5 minutes. 
2. Serve over yogurt with cinnamon and pistachios. Drizzle with honey if desired. 

(Caramelize a pound or more and keep them in your fridge for pairing with oatmeal or cheese)


I pulled this recipe from a magazine but forgot to write down which one. If anyone else knows the source, let me know so I can link it. 

Tuesday, May 29, 2012

a taste of tuesday: Pea Shoot BLT Salad


BLT Pea Shoot salad
Pea shoots are basically the leaves of young pea plants. I got ours from our local farmer's market.

But I borrowed this picture from here
Everything tastes better with meat candy. That's what my brother, Gene, calls bacon. Meat candy.. and there is good reason for it. This recipe (from Everyday w/ Rachael Ray) is fun, easy and delicious, but not one that I would recommend eating everyday. Even though 3 of the 4 main ingredients are veggies, the bacon (and accompanying grease) makes this dish far from what I'd call 'healthy'... but it was delicious none the same! Did I say it was delicious? 


Ingredients

  • ounces sliced bacon, cut crosswise into 1/4-inch pieces
  • large clove garlic, smashed and peeled
  • 12 ounces fresh pea shoots
  • cup grape tomatoes, halved
  • Salt and pepper

Directions

  1. In a wok or large skillet, cook the bacon over medium-high heat, stirring, until nearly crisp, about 3 minutes. I prefer to cook my bacon in the toaster oven at 400 for 15-18 minutes - less mess and you can control the amount of grease that ends up in your final dish. Cook and then transfer bacon and a little bit of it's geasy goodness into a large skillet.
  2. Add the garlic and cook for 1 minute. Add the pea shoots and stir-fry until just wilted, about 2 minutes. Add the tomatoes; toss. Season with salt and pepper. Serve hot.
What's your favorite pea shoot recipe?

Tuesday, May 22, 2012

a taste of tuesday: Quick Rhubarb Pickles

Quick Rhubarb Pickles
I love rhubarb. But not for the reasons one might think. It's not the taste I'm in love with, but the memories. 1980-something, summertime, free range of the neighborhood for whatever game we (anywhere from 4-15 neighborhood kids) came up with, munching on the tart stalks of rhubarb that grew behind the Garbe's house. 


This is an über easy recipe (from Everyday with Rachael Ray) for that overgrown rhubarb you have in your garden. 
If you'd rather use your rhubarb for something sweet, check out this rhubarb cardamom galette.

Ingredients

  • cups cider vinegar
  • 1 1/2 cups sugar
  • 1 1/2 tablespoons coarse salt
  • 1/2 teaspoon yellow mustard seeds
  • 10 whole cloves
  • 10 whole black peppercorns
  • piece  (1 1/2 inch) fresh ginger, peeled and thinly sliced
  • lemon
  • pound fresh rhubarb, cut crosswise into 3/4-inch pieces

Directions

  1. In a nonreactive medium saucepan, combine the vinegar, sugar, salt, mustard seeds, cloves and peppercorns. Cook over medium heat, stirring occasionally, until the sugar is just dissolved, about 5 minutes. Add the ginger, then use a vegetable peeler to slice strips of zest from the lemon; add to the saucepan. Let the liquid cool to room temperature, about 30 minutes.
  2. Divide the rhubarb among 3 clean, small glass jars. ladle in the cooled brine mixture. Top with the lids and refrigerate the pickles for 2 days before eating. (The pickles will keep refrigerated for up to 1 month.)
They taste great! Use as a snack, side dish, or to top a salad. 


Tuesday, April 10, 2012

a taste of tuesday: Energy Balls

I have been experimenting with making organic energy balls. There are a million different recipes for them. Literally. Type in "energy ball recipe" into google and come back with 4,990,000 results.  So when I say millions, I'm not lying. But I have to say that my blogger friend, Kim at your green baby, has been most of my inspiration with all the yummy delicious snacks she makes for her little guy. So, last week I scoured the pantry and came up with this concoction: 

Gluten Free Organic Energy Balls Recipe:


1 Tbsp organic hemp seeds 
1 Tbsp organic chia seeds
1 Tbsp organic honey
1/4 C organic sunflower seeds
1/4 C organic pumpkin seeds
1/4 C organic coconut flakes (I crushed them into smaller pieces after I took this photo)
1/4 C organic gluten free oats
1/4 C organic dried cranberries
1/2 C organic nut butter


Note: Next time I will use more nut butter since I kept adding more ingredients. My end product was a bit crumbly. You decide how much you need based on what texture you like. And experiment with ingredients... try adding granola instead of oats, agave instead of honey, chocolate chips or raisins instead of cranberries.  The possibilities are endless!!

Combine everything in a large bowl and mix well.

Roll into balls and set on wax paper and refrigerate minimum 1 hour. Enjoy.

Everyone in our family loved these... and they went so fast I didn't get a chance to take another 'pretty' photo of them... or a photo of any one of us enjoying them!! 

What is your favorite snack for the whole family?


Sunday, October 23, 2011

a better gluten free apple crisp

A while back I posted a gluten free apple crisp recipe.  Well, I'm back again to tell you that the one below is soooo much better! Enjoy!!


A Better Apple Crisp - Gluten Free

1 cup Pamela's Baking and Pancake Mix
1/4 cup granulated sugar
11/4 tsp baking powder
1 tsp cinnamon
1/2 tsp xantham gum
1/2 tsp salt
1 large egg
6 cups thinly sliced apples
1/3 cup melted butter

1. preheat oven to 350 degrees. Position rack in center of the oven. Lightly grease 8x8 baking dish with gluten free cooking spray.

2. To make the crumble, combine pamela's mix, sugar, baking powder, cinnamon, xantham gum, and salt in a small bowl. 
Add egg and stir to mix well (mixture should be crumbly)

3. Place apples in baking dish and sprinkle top with crumble mixture.  Drizzle with melted butter. 

4. Bake about 40 minutes or until apples are tender and topping is a golden color.  Serve warm with a dollop of vanilla bean ice cream.


Monday, October 10, 2011

Apples - 3 ways...

At the Farmer's Market, we brought home a box of apples for baking. 


I started out peeling, coring, and slicing with my handy apple peeler, corer, slicer to freeze the apples.  While I was in process, Jenn decided she'd like a crisp.  


Gluten Free Apple Crisp: (please see a better GF apple crisp here)

Preheat oven to 350 degrees
Grease 8x8 baking dish 
  • Fill baking dish half way with sliced apples (some people prefer to leave the skin on) and set aside

To make the crumble, stir in a large bowl until moistened:
  • 1/2 C gluten free rolled oats (we use Bob's Red Mill)
  • 2-3 T vanilla rice milk (or soy or almond or whatever you have)
  • set aside for 10 minutes
Add to oats:
  • 1/2 C gluten free baking mix (Namaste pancake or muffin mix or rice flour will do in a pinch)
  • 1/2 C light brown sugar
  • 1 t ground cinnamon
Stir to mix
  • Add dabs of 3-4 T butter

Rub oat/flour mix into butter with fingers until crumbly and moist. Add more rice milk if needed. Evenly spread crumble over the apples.  Bake 30-40 minutes until golden brown and apples are tender but not mushy. Enjoy hot with a scoop of vanilla bean ice cream on top!


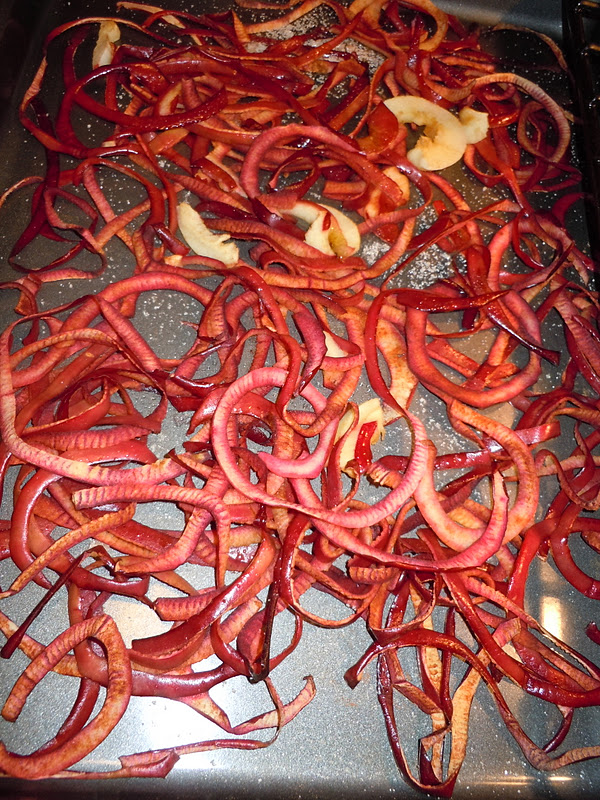
Cinnamon and Sugar Peels:

I had a bunch of peelings and cores left over. I could have composted them, but they were calling to me to do more.  So I did an internet search to try to find ideas for using the peels and cores in clever ways.  

I found a suggestion for the peels. Sprinkle with cinnamon and sugar and bake for a tasty treat. Which I did. I was tired and didn't bake them long enough, but they are still delicious.  I would suggest the lowest heat possible, and crack open your oven while baking.  Check them after 45 minutes, and continue to check after that until dried to your desire. A great snack for on the go... or added to your favorite GORP.


DIY Apple Cider Vinegar

But what to do with the cores? Do it yourself Apple cider vinegar!!! 


I put the cores and any leftover peels into a wide mouth jar.


Fill with water and cover with cheesecloth or towel.  Then store in a warm, dark place.  I marked the jar with the date and in 30-60 days, voila, DIY Organic Apple Cider Vinegar.  I will keep you posted on how it comes out!


And, I still have half of a box of apples to work with.  It's gonna be a pie, crisp, yummy winter.  

Monday, October 3, 2011

Plum Ginger Crumble (gluten free)

As promised, I am finally posting the sweet goodness that came of the plum boom graciously shared by our neighbors/friends, Sara and John and their little guy Carter.


We shared one crumble with another neighbor/friend, Lara, who was 39 weeks pregnant... and it wasn't long after eating this delicious crumble that her little Anna was born. (Okay, so maybe it was a few days, but I like to dream that we helped coax her into a world where such sweetness exists).

Jenn and I pretty much polished off the other crumble in less than a day.  The plum generous neighbors/friends, Sara and John, have been patient and I'm hoping to make them a crumble as a thank you for their delicious plums.

Did I mention that this recipe is gluten free.  I cannot take credit for the recipe... I snagged it from Shauna, the Gluten-Free Girl and the Chef.  They have a great blog on G-F and some books too. I'm not Gluten-Free but my lovely is... So I've been trying to shift from my mom's and grandmother's recipes and this one takes the cake.... er... I mean crumble! In fact, this is one of those G-F recipes that I could sneak past my brothers and they wouldn't even suspect.  Give it a go!!!


Plum Ginger Crumble


2 tablespoons brown sugar
1 1/2 tablespoon plus 1 cup gluten-free flour
1/4 plus 1/2 teaspoon cinnamon
1/4 teaspoon ground ginger
2 heaping tablespoons of finely chopped candied ginger
12-24* Italian plums
3/4 cup granulated sugar
1 teaspoon baking powder
1/4 teaspoon salt
1 well-beaten egg
1/2 cup unsalted butter - melted
*The Italian plums I used were pretty small and I used an 8x8 casserole dish for my first batch - thus 12 plums wasn't enough.  For my second and third batch (pictured above), I lined the pans with the cut plums to see how many I needed before I added them to the mixture. 
°Heat oven to 375° degrees, with rack in center. 
° Thoroughly mix brown sugar, 1 1/2 tablespoons flour, 1/4 teaspoon cinnamon, ground ginger, and candied ginger. Add to plums and mix well. Arrange, skin side up, in ungreased, deep 9-inch pie plate. 
°Combine remaining sugar, baking powder, flour, cinnamon, and salt. Mix well. Stir in egg. Then, using hands, mix thoroughly to produce little particles. Sprinkle over plums. 
°Drizzle butter evenly over crumb mixture and bake for 30 to 35 minutes. The crumble is done when the top is browned and plums yield easily when pricked. Remove from oven and cool.
°Serve warm or refrigerate for up to two days or freeze well covered.


And did I mention the ginger... that's my favorite part!! yum!